01 April 2014

VisualTreeHelper in wp7


        /// <summary>
        /// Finds a Child of a given item in the visual tree.
        /// </summary>
        /// <param name="parent">A direct parent of the queried item.</param>
        /// <typeparam name="T">The type of the queried item.</typeparam>
        /// <param name="childName">x:Name or Name of child. </param>
        /// <returns>The first parent item that matches the submitted type parameter.
        /// If not matching item can be found,
        /// a null parent is being returned.</returns>
        public static T FindChild<T>(DependencyObject parent, string childName)
           where T : DependencyObject
        {
            // Confirm parent and childName are valid.
            if (parent == null) return null;

            T foundChild = null;

            int childrenCount = VisualTreeHelper.GetChildrenCount(parent);
            for (int i = 0; i < childrenCount; i++)
            {
                var child = VisualTreeHelper.GetChild(parent, i);
                // If the child is not of the request child type child
                T childType = child as T;
                if (childType == null)
                {
                    // recursively drill down the tree
                    foundChild = FindChild<T>(child, childName);

                    // If the child is found, break so we do not overwrite the found child.
                    if (foundChild != null) break;
                }
                else if (!string.IsNullOrEmpty(childName))
                {
                    var frameworkElement = child as FrameworkElement;
                    // If the child's name is set for search
                    if (frameworkElement != null && frameworkElement.Name == childName)
                    {
                        // if the child's name is of the request name
                        foundChild = (T)child;
                        break;
                    }
                }
                else
                {
                    // child element found.
                    foundChild = (T)child;
                    break;
                }
            }
            return foundChild;
        }
     

31 March 2014

How to install Java on windows

How to Install Java in Windows 7

Java

1. First check whether Java is installed or not in your system.
  • Open MyComputer > Local Disk C: > Program Files > Common Files  and see if a folder named "Java" is present.
  • If the "Java" folder is present then you need to check if "environment variables path" is set or not
  •  If java dose not exist then you need to download  java jdk from Oracle website. Accept license agreement before downloading. Select your os(32 or 64-bit) and download. 
  • Java is open source software. It provides free download to the users and developers.
  • There are two kinds of java packages, one is jdk :- Java Development Kit, and other is jre:- Java Runtime Envirement
  • JDK:- It is used by developers to develop java based programmes like standalone(Disktop) and server applications.
  • JRE:- Is used to by the operating system to run java applications in the local computer.
  • JRE will convert java bite code instructions to system understandable Machine code which is executed by the system.
  • To download java for free click below link

Download and install java jdk. 
  • Install Java from the download.
  • Now Installation is successfull but its not yet over,  you need to set environment variables
  • Open command prompt and type javac in command line.
  • Then it shows 'Javac' is not recognized as an internal or external command.checking-for-java
  • You need to set environment variable path to avoid this java error.
  • In order to set path right click on Computer and click properties there you can find advanced system settings on left side pannel of the window.
    MyComputer-propertiesAdvanced-System-Settings

  • Now click on Advanced tab.
  • Under Advanced tab click environment variables button as shown below.


System-Properties

  • On clicking the button you find a Environment Variable popup.
  •  Now under User variables click "New" and set 
  • variable name : PATH and variable value : C:\Program Files\Java\jdk1.7.0\bin .
  • Then click OK.
  • Now again open command prompt to check if java is installed or not.
  • To do this you need to type javac on the command line It will show all java commands as shown in below image.It means that java has been successfully installed on your computer.


check-for-java

  • Now you can use notepad to write the code or download any IDE(Integrated Development Environment) and start programming(Starting with eclipse).
       Check this: Java programmes for beginners

14 March 2014

Change Background Image on pressed ListBox

<Grid x:Name="LayoutRoot" Background="Transparent">
        <!--toolkit:TiltEffect.IsTiltEnabled="True"-->
        <ListBox x:Name="Channel_List" SelectionChanged="Listbox1_SelectionChanged" >
         
            <ListBox.ItemTemplate>
                <DataTemplate>
                 
                    <ListBoxItem >
                        <StackPanel Width="490" MouseLeave="StackPanel_MouseLeave"  MouseLeftButtonDown="StackPanel_MouseLeftButtonDown" MouseLeftButtonUp="StackPanel_MouseLeftButtonUp">
                            <StackPanel.Background>
                                <ImageBrush ImageSource="/Assets/Images/channel-bg-unsel.png"/>
                            </StackPanel.Background>
                            <Image Source="{Binding Image}" />
                            <TextBlock Text="{Binding StationName}" FontFamily="Segoe Print" />
                        </StackPanel>
                    </ListBoxItem>
                 
                </DataTemplate>
            </ListBox.ItemTemplate>
         
        </ListBox>


    </Grid>


/////handle click events in code behind..


private void StackPanel_MouseLeftButtonDown(object sender, System.Windows.Input.MouseButtonEventArgs e)
        {
            var obj = (sender as StackPanel);
            ImageSource img = new BitmapImage(new Uri("/Assets/Images/channel-bg-sel.png", UriKind.Relative));
           ImageBrush ig = new ImageBrush();
           ig.ImageSource = img;
           obj.Background = ig;
            //obj.Background =
        }

        private void StackPanel_MouseLeftButtonUp(object sender, System.Windows.Input.MouseButtonEventArgs e)
        {
            var obj = (sender as StackPanel);
            ImageSource img = new BitmapImage(new Uri("/Assets/Images/channel-bg-unsel.png", UriKind.Relative));
            ImageBrush ig = new ImageBrush();
            ig.ImageSource = img;
            obj.Background = ig;
        }

        private void StackPanel_MouseLeave(object sender, System.Windows.Input.MouseEventArgs e)
        {
            var obj = (sender as StackPanel);
            ImageSource img = new BitmapImage(new Uri("/Assets/Images/channel-bg-unsel.png", UriKind.Relative));
            ImageBrush ig = new ImageBrush();
            ig.ImageSource = img;
            obj.Background = ig;
        }


selectedSelected-background-image

unselectedSelected-background-image

12 March 2014

WP7 Identity of the caller.

unable to determine application identity of the caller. settings class

or


Exception while using IsolatedStorageSettings:
System.IO.IsolatedStorage.IsolatedStorageException: Unable to determine
application Identity of the caller.
 at System.IO.IsolatedStorage.IsolatedStorage.InitStore(IsolatedScope
scope,Type appEvidenceType)
 at System.IO.IsolatedStorage.IsolatedStorageFile.GetStore(IsolatedScope
scope,Type applicationEvidenceType)
 at System.Io.IsolatedStorage.IsolatedStorageSettings..ctor(boolean
useSiteSettings)
 at System.IO.IsolatedStorage.IsolatedStorageSettings.get_ApplicationSettings()
 at ManasutoApp.AppSettings..ctor() in


Try this code in your settings class.

if (!System.ComponentModel.DesignerProperties.IsInDesignTool)
                {
                    settings = IsolatedStorageSettings.ApplicationSettings;
                }


"check if the code is running in (visual studio or blend) using DesignerProperties.IsInDesignTool since accessing IsolatedStorageSettings in Visual Studio or Expression Blend is invalid."

I found this from StackOverFlow ..


Specified argument was out of the range of valid values. wp7.

for this you need to lode the settings class in Loded event.
public partial class Page2 : UserControl
public Page2(){
  Loaded += ChannelsPage_Loaded;
         
        }

        void ChannelsPage_Loaded(object sender, RoutedEventArgs e)
        {
            appSettings = new AppSettings();
            this.isolatedSettings(); // here you are calling method that uses isolated class

            var deviceId = DeviceExtendedProperties.GetValue("DeviceUniqueId"); // devide id of your Wp7
            byte[] bID = (byte[])deviceId;
            string deviceID = Convert.ToBase64String(bID);
        }


if possible instantiate "settings" Class as


if (!System.ComponentModel.DesignerProperties.IsInDesignTool)
                {
                    settings = AppSettings();// where you lode entire data from isolated storage
                }

25 February 2014

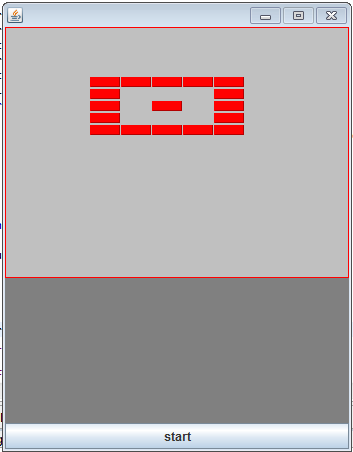
Arraigning Bricks In Our Game

Arrange-Bricks


import java.awt.BorderLayout;
import java.awt.Color;
import java.awt.Graphics;
import java.awt.Rectangle;
import java.util.ArrayList;

import javax.swing.JButton;
import javax.swing.JFrame;
import javax.swing.JPanel;

public class Bricks extends JPanel implements Runnable {

 // variables declaration for brick...............................
    //starting position of the bricks
 int brickx = 85;
 int bricky = 50;

 //You can specify length and breadth of the bricks here
 int brickBreadth = 50;
 int brickHeight = 40;
 // variables declaration for brick...............................
 // ===============================================================

 private static final String[] LEVELS_ONE = new String[] {
  "WWWWW",
  "W   W",
  "W W W",
  "W   W",
  "WWWWW"
  };
 private static final String[] LEVELS_TWO = new String[] {
  "WWWWW",
  "     ",
  "W W W",
  "     ",
  "WWWWW"
  };

 ArrayList<Rectangle> Brick = new ArrayList<Rectangle>();
 Thread t;

 Bricks() {

  setFocusable(true);
  t = new Thread(this);
  t.start();
 }

 public static void main(String[] args) {
  JFrame frame = new JFrame();
  Bricks game = new Bricks();
  JButton restart = new JButton("start");
  // JLabel lbl_startGame = new JLabel("Start Game", JLabel.LEFT);

  frame.setSize(350, 450);
  frame.setDefaultCloseOperation(JFrame.EXIT_ON_CLOSE);

  frame.add(game);

  frame.add(restart, BorderLayout.SOUTH);
  frame.setLocationRelativeTo(null);
  frame.setResizable(false);
  frame.setVisible(true);

 }

 public void paint(Graphics g) {
  g.setColor(Color.LIGHT_GRAY);
  g.fillRect(0, 0, 350, 450);
  g.setColor(Color.blue);

  g.setColor(Color.green);
  g.setColor(Color.GRAY);
  g.fillRect(0, 251, 450, 200);
  g.setColor(Color.red);
  g.drawRect(0, 0, 343, 250);
  for (int i = 0; i < Brick.size(); i++) {
   if (Brick.get(i) != null) {
    g.fill3DRect(Brick.get(i).x, Brick.get(i).y,
      Brick.get(i).width, Brick.get(i).height, true);
   }
  }

 }

 int brickscount;

 public void run() {

  int xaxis = brickx;
  int yaxis = bricky;

  for (int row = 0; row < LEVELS_ONE.length; row++) {
   for (int col = 0; col < LEVELS_ONE[row].length(); col++) {

    if (LEVELS_ONE[row].charAt(col) == 'W') {

     Brick.add(new Rectangle(xaxis, yaxis, brickBreadth, brickHeight));
     xaxis += (brickBreadth+1);

    }
    if (LEVELS_ONE[row].charAt(col) == ' ') {
     xaxis += (brickBreadth+1);

    }

   }
   yaxis += (brickHeight+2);
   xaxis = brickx;
  }

 }// while loop ends here

}

Click here for Breaking Bricks Game Code

Also see Bullet shooting game using Java.

Multiple windows in any android device.

Multitasking

  • Defined as the ability to perform many tasks at same time.
Now a days almost all phones can do multitasking.
All android phones support multitasking, this is done by placing the active tasks in a queue on ram so that they can be switched any time. But at a given time only one task can be done and cannot work on multiple tasks at same time.
Android platform offers multiple windows applications to work on multiple applications at same time. Here are some applications which help multi window tasking.

Floating Apps(Multitasking)

Floating-Apps
  • You can turn home screen widgets or any URL in to floating window using this application. 
  • Windows can be minimized or resized or moved. 
  • Many floating apps are available by default. 
  • Works on any android phone and tablet. 


Available floating apps:  

Floating Applications Floating Active windows Floating Launcher
Floating Add bookmark Floating Bookmarks Floating Search Google
Floating Browser Floating Calculator Floating Search Wikipedia
Floating Dialer Floating Flashlight Floating Stopwatch
Floating System information Floating Video player Floating Add contact
Floating Countdown Floating Facebook Floating File browser
Floating Google plus Floating Image viewer Floating Music player
Floating Notes Floating PDF viewer Floating Task Killer
Floating Translate Floating Twitter Floating Vimeo
Floating Wifi manager Floating Youtube

 Or create your own floating apps from home screen widgets or URLs!

Link to download Floating Apps  DOWNLOAD

Tiny Apps(Floating)

Tiny-apps-floating
  • Tiny Apps is a package of 7 useful floating apps that stay on top of all other apps. All windows can be moved, resized and docked to the left side of your screen to hide and show windows quickly. Use your volume buttons to change the transparency of each window!
Tiny Apps Pro enables the following features:
- dock windows to the left side of your screen
- adjust a window's transparency by using your volume buttons
- 2 additional Tiny Apps: widgets and browser
You can run several windows of the same Tiny App.

Link to download Floating Apps  DOWNLOAD

22 February 2014

History of Android

History-of-android


  • Android is an opensource operating system based on the Linux kernel and designed primarily for touchscreen mobile devices.
  • Initially developed by Android, Inc., which Google backed financially and later bought in 2005.
Google-Android

  • Unveiled in 2007 
  • The first publicly available smartphone running Android, the HTC Dream, was released on October 22, 2008

First-Android-SmartPhone-HTC-Dream

  • Android Evolution;


Android-Evolution
  • Android 0.9 is the first version(beta) and has no name.
  • Version 1.0 is named as Apple pie, and Version 1.1 as Banana Bread

Contact Form

Name

Email *

Message *

Smooth Graphics Java

// Arrange Bricks in Game //java brick breaker game code without flickering // added game levels 1,2,3 in the game //java paddle ball ga...