Showing posts with label PROGRAMMING. Show all posts

10 April 2014

Key Down events in wp7

<TextBox Name="hrTextBox" MaxLength="1" Text="0"  KeyDown="hrTextBox_KeyDown" TextAlignment="Center" InputScope="Number"/>


Add this in your construcor to allow only numbers in text box


            InputScope scope = new InputScope();
            InputScopeName name = new InputScopeName();

            name.NameValue = InputScopeNameValue.Number;
            scope.Names.Add(name);


            minTextBox.InputScope = scope;

 private void hrTextBox_KeyDown(object sender, KeyEventArgs e)
        {
            switch (e.Key)
            {
                case Key.D0:
                case Key.D1:
                case Key.D2:
                case Key.D3:
                case Key.D4:
                case Key.Back:
                case Key.Delete:
                    break;
                default: e.Handled = true;
                    return;
            }
        }


        private void minTextBox_KeyDown(object sender, KeyEventArgs e)
        {
            if (minTextBox.Text != "")
            {
                if (int.Parse(minTextBox.Text) >= 6)
                {
                    switch (e.Key)
                    {
                        case Key.Back:
                        case Key.Delete:
                            break;
                        default: e.Handled = true;
                            return;
                    }
                }
            }

09 April 2014

Play shoutcast stream in Windows phone 7


Here are the steps to play shoutcast stream in wp7.

1) Download the open source project from here
2) extract the file and check the folders in the project
you will find "Bin" and "src" folders. open "src" folder
3) Now you will find following packages:-
Shoutcast.Sample
Shoutcast.Sample.Phone
Shoutcast.Sample.Phone.Background
Shoutcast.Sample.Phone.Background.PlaybackAgent
Silverlight.Media.ShoutCast
4) Add Shoutcast.Sample.Phone.Background.PlaybackAgent, and
Silverlight.Media.ShoutCast in to your project
5) Now go to your main project(UI project) right click on Referencts and select add Reference
6) Select "Solution" in right pannel there you will find projects (Shoutcast.Sample.Phone.Background.Playback
Silverlight.Media.ShoutCast.Phone)
7) Check the box Shoutcast.Sample.Phone.Background.Playback project and click "Ok"
(Note:- if you dont want to play background audio than you can add only Silverlight.Media.ShoutCast.Phone to your project)
8) Now go to Properties folder on top of the References go to WMAppManifest.xml right click on that and open with "xml(Text) editor"(this is for vs 2012)
9) add the following lines below </Capabilities>
    <Tasks>
      <DefaultTask Name="_default" NavigationPage="YourMainPage.xaml" />
      <ExtendedTask Name="BackgroundTask">
        <BackgroundServiceAgent Specifier="AudioPlayerAgent" Name="Shoutcast.Sample.Phone.Background.PlaybackAgent" Source="Shoutcast.Sample.Phone.Background.PlaybackAgent" Type="Shoutcast.Sample.Phone.Background.Playback.AudioPlayer" />
        <BackgroundServiceAgent Specifier="AudioStreamingAgent" Name="Shoutcast.Sample.Phone.Background.StreamAgent" Source="Shoutcast.Sample.Phone.Background.PlaybackAgent" Type="Shoutcast.Sample.Phone.Background.Playback.AudioTrackStreamer" />
      </ExtendedTask>
    </Tasks>
10) now rebuild your entire solution check to see if any errors in your build. if no errors found then your back ground audio should work


-Please comment for any quires. 

01 April 2014

VisualTreeHelper in wp7


        /// <summary>
        /// Finds a Child of a given item in the visual tree.
        /// </summary>
        /// <param name="parent">A direct parent of the queried item.</param>
        /// <typeparam name="T">The type of the queried item.</typeparam>
        /// <param name="childName">x:Name or Name of child. </param>
        /// <returns>The first parent item that matches the submitted type parameter.
        /// If not matching item can be found,
        /// a null parent is being returned.</returns>
        public static T FindChild<T>(DependencyObject parent, string childName)
           where T : DependencyObject
        {
            // Confirm parent and childName are valid.
            if (parent == null) return null;

            T foundChild = null;

            int childrenCount = VisualTreeHelper.GetChildrenCount(parent);
            for (int i = 0; i < childrenCount; i++)
            {
                var child = VisualTreeHelper.GetChild(parent, i);
                // If the child is not of the request child type child
                T childType = child as T;
                if (childType == null)
                {
                    // recursively drill down the tree
                    foundChild = FindChild<T>(child, childName);

                    // If the child is found, break so we do not overwrite the found child.
                    if (foundChild != null) break;
                }
                else if (!string.IsNullOrEmpty(childName))
                {
                    var frameworkElement = child as FrameworkElement;
                    // If the child's name is set for search
                    if (frameworkElement != null && frameworkElement.Name == childName)
                    {
                        // if the child's name is of the request name
                        foundChild = (T)child;
                        break;
                    }
                }
                else
                {
                    // child element found.
                    foundChild = (T)child;
                    break;
                }
            }
            return foundChild;
        }
     

14 March 2014

Change Background Image on pressed ListBox

<Grid x:Name="LayoutRoot" Background="Transparent">
        <!--toolkit:TiltEffect.IsTiltEnabled="True"-->
        <ListBox x:Name="Channel_List" SelectionChanged="Listbox1_SelectionChanged" >
         
            <ListBox.ItemTemplate>
                <DataTemplate>
                 
                    <ListBoxItem >
                        <StackPanel Width="490" MouseLeave="StackPanel_MouseLeave"  MouseLeftButtonDown="StackPanel_MouseLeftButtonDown" MouseLeftButtonUp="StackPanel_MouseLeftButtonUp">
                            <StackPanel.Background>
                                <ImageBrush ImageSource="/Assets/Images/channel-bg-unsel.png"/>
                            </StackPanel.Background>
                            <Image Source="{Binding Image}" />
                            <TextBlock Text="{Binding StationName}" FontFamily="Segoe Print" />
                        </StackPanel>
                    </ListBoxItem>
                 
                </DataTemplate>
            </ListBox.ItemTemplate>
         
        </ListBox>


    </Grid>


/////handle click events in code behind..


private void StackPanel_MouseLeftButtonDown(object sender, System.Windows.Input.MouseButtonEventArgs e)
        {
            var obj = (sender as StackPanel);
            ImageSource img = new BitmapImage(new Uri("/Assets/Images/channel-bg-sel.png", UriKind.Relative));
           ImageBrush ig = new ImageBrush();
           ig.ImageSource = img;
           obj.Background = ig;
            //obj.Background =
        }

        private void StackPanel_MouseLeftButtonUp(object sender, System.Windows.Input.MouseButtonEventArgs e)
        {
            var obj = (sender as StackPanel);
            ImageSource img = new BitmapImage(new Uri("/Assets/Images/channel-bg-unsel.png", UriKind.Relative));
            ImageBrush ig = new ImageBrush();
            ig.ImageSource = img;
            obj.Background = ig;
        }

        private void StackPanel_MouseLeave(object sender, System.Windows.Input.MouseEventArgs e)
        {
            var obj = (sender as StackPanel);
            ImageSource img = new BitmapImage(new Uri("/Assets/Images/channel-bg-unsel.png", UriKind.Relative));
            ImageBrush ig = new ImageBrush();
            ig.ImageSource = img;
            obj.Background = ig;
        }


selectedSelected-background-image

unselectedSelected-background-image

12 March 2014

WP7 Identity of the caller.

unable to determine application identity of the caller. settings class

or


Exception while using IsolatedStorageSettings:
System.IO.IsolatedStorage.IsolatedStorageException: Unable to determine
application Identity of the caller.
 at System.IO.IsolatedStorage.IsolatedStorage.InitStore(IsolatedScope
scope,Type appEvidenceType)
 at System.IO.IsolatedStorage.IsolatedStorageFile.GetStore(IsolatedScope
scope,Type applicationEvidenceType)
 at System.Io.IsolatedStorage.IsolatedStorageSettings..ctor(boolean
useSiteSettings)
 at System.IO.IsolatedStorage.IsolatedStorageSettings.get_ApplicationSettings()
 at ManasutoApp.AppSettings..ctor() in


Try this code in your settings class.

if (!System.ComponentModel.DesignerProperties.IsInDesignTool)
                {
                    settings = IsolatedStorageSettings.ApplicationSettings;
                }


"check if the code is running in (visual studio or blend) using DesignerProperties.IsInDesignTool since accessing IsolatedStorageSettings in Visual Studio or Expression Blend is invalid."

I found this from StackOverFlow ..


Specified argument was out of the range of valid values. wp7.

for this you need to lode the settings class in Loded event.
public partial class Page2 : UserControl
public Page2(){
  Loaded += ChannelsPage_Loaded;
         
        }

        void ChannelsPage_Loaded(object sender, RoutedEventArgs e)
        {
            appSettings = new AppSettings();
            this.isolatedSettings(); // here you are calling method that uses isolated class

            var deviceId = DeviceExtendedProperties.GetValue("DeviceUniqueId"); // devide id of your Wp7
            byte[] bID = (byte[])deviceId;
            string deviceID = Convert.ToBase64String(bID);
        }


if possible instantiate "settings" Class as


if (!System.ComponentModel.DesignerProperties.IsInDesignTool)
                {
                    settings = AppSettings();// where you lode entire data from isolated storage
                }

25 February 2014

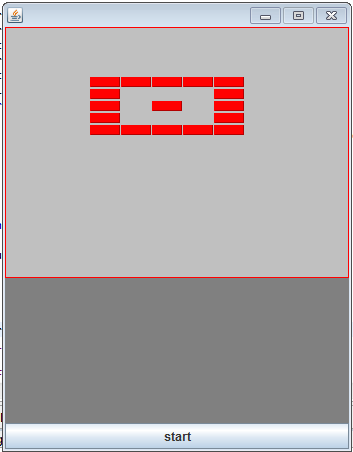
Arraigning Bricks In Our Game

Arrange-Bricks


import java.awt.BorderLayout;
import java.awt.Color;
import java.awt.Graphics;
import java.awt.Rectangle;
import java.util.ArrayList;

import javax.swing.JButton;
import javax.swing.JFrame;
import javax.swing.JPanel;

public class Bricks extends JPanel implements Runnable {

 // variables declaration for brick...............................
    //starting position of the bricks
 int brickx = 85;
 int bricky = 50;

 //You can specify length and breadth of the bricks here
 int brickBreadth = 50;
 int brickHeight = 40;
 // variables declaration for brick...............................
 // ===============================================================

 private static final String[] LEVELS_ONE = new String[] {
  "WWWWW",
  "W   W",
  "W W W",
  "W   W",
  "WWWWW"
  };
 private static final String[] LEVELS_TWO = new String[] {
  "WWWWW",
  "     ",
  "W W W",
  "     ",
  "WWWWW"
  };

 ArrayList<Rectangle> Brick = new ArrayList<Rectangle>();
 Thread t;

 Bricks() {

  setFocusable(true);
  t = new Thread(this);
  t.start();
 }

 public static void main(String[] args) {
  JFrame frame = new JFrame();
  Bricks game = new Bricks();
  JButton restart = new JButton("start");
  // JLabel lbl_startGame = new JLabel("Start Game", JLabel.LEFT);

  frame.setSize(350, 450);
  frame.setDefaultCloseOperation(JFrame.EXIT_ON_CLOSE);

  frame.add(game);

  frame.add(restart, BorderLayout.SOUTH);
  frame.setLocationRelativeTo(null);
  frame.setResizable(false);
  frame.setVisible(true);

 }

 public void paint(Graphics g) {
  g.setColor(Color.LIGHT_GRAY);
  g.fillRect(0, 0, 350, 450);
  g.setColor(Color.blue);

  g.setColor(Color.green);
  g.setColor(Color.GRAY);
  g.fillRect(0, 251, 450, 200);
  g.setColor(Color.red);
  g.drawRect(0, 0, 343, 250);
  for (int i = 0; i < Brick.size(); i++) {
   if (Brick.get(i) != null) {
    g.fill3DRect(Brick.get(i).x, Brick.get(i).y,
      Brick.get(i).width, Brick.get(i).height, true);
   }
  }

 }

 int brickscount;

 public void run() {

  int xaxis = brickx;
  int yaxis = bricky;

  for (int row = 0; row < LEVELS_ONE.length; row++) {
   for (int col = 0; col < LEVELS_ONE[row].length(); col++) {

    if (LEVELS_ONE[row].charAt(col) == 'W') {

     Brick.add(new Rectangle(xaxis, yaxis, brickBreadth, brickHeight));
     xaxis += (brickBreadth+1);

    }
    if (LEVELS_ONE[row].charAt(col) == ' ') {
     xaxis += (brickBreadth+1);

    }

   }
   yaxis += (brickHeight+2);
   xaxis = brickx;
  }

 }// while loop ends here

}

Click here for Breaking Bricks Game Code

Also see Bullet shooting game using Java.

19 February 2014

Coding Tools

Notepad
  • Notepad can be used to write and edit java code.
  • The notepad file must be saved with '.java' extension.
  • Name of the file must be same as that of the class being written in it.
  • This file can be accessed with command prompt and can be compiled and run.
  • cmd to compile java file : javac <space>filename.java
  • If it shows no errors then the command to run java file is : java <space> filename

 Writing java code can be made simple using IDEs. A number of java IDEs are available on internet
Some of the IDEs for programming java are:
  • Eclipse
  • Netbeans
  • BlueJ
  • JCreator
  • IntelliJ Idea
  • JBuilder
If you are a beginner in programming then it is good to start practicing with notepad or else you can go with IDEs.

Out of all these IDEs Eclipse is the most preferrable one.It is a free software.You can download Eclipse at Download Eclipse                         
     

Starting with Eclipse

  • After downloading the eclipse IDE you need to extract the .ZIP file in to a folder in which you can find eclipse loader(eclipse.exe)
  • Now click on eclipse.exe and authorize the security warning(click run). You will be asked to select a workspace where all your eclipse files will be saved. Click browse and select a new empty folder and click OK.
  • Eclipse starts with a welcome screen. now open window > open prespective > java. Now you are ready to create and work with projects.

HOW TO CREATE A NEW PROJECT AND NEW CLASS. 

  • Goto File > new > Java Project and give some name to your project and click ok.
    New-project

  •  You can see your project created below the package explorer window on the left.
    Package-explorer

  • To create a new class right click on the project you just created select new and again select class.
    New-class

  •  A window appears in which name of the class is given(First letter of the class in CAPITALS). Check the box as shown below and click finish.
    class-details
  • Now a java file is created with a class name same as file name. Main method is also included in it.
  • The code that is to be executed is written inside the main method.

Program to display all prime number below a user entered number

Create a new Class with name Disp_primes:

import java.util.Scanner;

public class Disp_primes {

    public static void main(String[] args) {
        // TODO Auto-generated method stub
       
        Scanner sc = new Scanner(System.in);
        System.out.println("Enter a number : ");
        int num = sc.nextInt();
        System.out.println("prime numbers below "+num+" are :");
        int rem=0;
        if(num==2){
            System.out.print(num+" is even prime");
        }
        else{
            for(int i=num;i>2;i--){
                int count=2;
        while(count<i){
            rem = i%count;
            if(rem==0)
                break;
            else
                count++;
                    }
        if(rem!=0)
            System.out.print(i+",");
        }
            if(num>2){
                System.out.print("2");
            }
        }
    }

}

Output:(Click on image to enlarge):
Program-to-display-all-prime-number-below-a-user-entered-number-output
(Comment if you have any doubts)
>

Program to check if a number is Prime or not

Create a new Class with name Chk_prime :

import java.util.Scanner;
 

public class Chk_prime {

    public static void main(String[] args) {
        // TODO Auto-generated method stub
        int rem=0,i=2;
        Scanner sc = new Scanner(System.in);
        System.out.println("Enter a number to check if it is prime : ");
        int num = sc.nextInt();
        System.out.println("You entered : "+num);
        if(num==2){
            System.out.print(num+" is even prime");
        }
        else{
        while(i<num){
            rem = num%i;
            if(rem==0){
                System.out.print(num+" is not prime");
            break;}
            else
                i++;
                    }
        if(rem!=0)
            System.out.print(num+" is prime");
        }
        }
    }


Output:(Click on image to enlarge)
Program-to-check-if-a number-is-Prime-or-not-output
(Comment if you have any doubts)

Program to check if a year is leap year or not

Create a new class with name Chk_leapyear: 

import java.util.Scanner;

public class Chk_leapyear {
   
    public static void main(String[] args) {
        // TODO Auto-generated method stub
       
        Scanner sc = new Scanner(System.in);
        System.out.println("Enter a year to check if it is leap year : ");
        int year = sc.nextInt();
        System.out.println("You entered : "+year);
        if(year%100==0){
            if(year%400==0)
                System.out.println(year+" is a leap year");
            else
                System.out.println(year+" is not a leap year");
        }
        else{
            if(year%4==0)
                System.out.println(year+" is a leap year");
            else
                System.out.println(year+" is not a leap year");
        }
    }

}

Output:(Click on image to enlarge)

Program-to-check-if-a-year-is-leap-year-or-not-output
Enter the year you want to check in the output window as shown above.
(Comment if you have any doubts)

First Java program

A demo file to initialize and display different variables:

  • Create a new class with name VariablesDemo:
public class VariablesDemo {

    public static void main(String[] args) {
   
        /* Declaration of variables  */
         int Id;
         String name;
         char gender;
         double salary;
    
         /* Initialization of variables*/
         Id = 4348;
         name = "Employer";
         gender ='M';
         salary = 25000.0;
    
        /* Display the employee details */
         System.out.println("Id : "+ Id);
         System.out.println("Name : "+ name);
         System.out.println("Gender : "+ gender);
         System.out.println("Salary : "+ salary);

        }
}
NOTE: 
  • The text between "/* " and "*/" will not be executed.They are used to write comments.
  • For single line comments use "//" 
 Output:(Click on the image to enlarge)
eclipse-output

Demonstration of Continue statement

Create a new class with name ControlContinue:

class ControlContinue {
    public static void main(String args[]) {
        //boolean bool = true;
        for (int i = 0; i < 5; i++) {
            for (int j = 0; j < 10; j++) {
                System.out.print(j + "\t");
                if (j > 5) {
                    System.out.println();
                    continue;
                }
            }
            System.out.println("Outer Loop");
        }
        System.out.println("End");
    }
}

Output:(Click on the image to enlarge)
Demonstration of Continue statement-output

Demonstration of break statement

create a class with name Control:

class Control {
    public static void main(String args[]) {
        for (int i = 0; i < 5; i++) {
            for (int j = 0; j < 10; j++) {
                System.out.print(j + "\t");
                if (j > 5) {
                    break;
                }
            }
            System.out.println("Outer Loop :"+(i+1));
        }
        System.out.println("End");
    }
}

Output: (Click on the image to enlarge)
Demonstration-of-break-statement-output

Program to print Fibonacci numbers below 'n'

Create a new Class with name Fibonacci:

import java.io.*;
class Fibonacci {
    public static void main(String args[]) throws IOException {
        BufferedReader br = new BufferedReader(new InputStreamReader(System.in));
        System.out.println("enter the value n");
        int n = Integer.parseInt(br.readLine());
        int a = 0, b = 1, c = 0;
        if (n > 0) {
            System.out.println("---------------------");
            System.out.println("\t" + a);
            System.out.println("\t" + b);
            do {
                c = a + b;
                if(c<=n)
                System.out.println("\t" + c);
                a = b;
                b = c;
            } while (c <= n);
            System.out.println("---------------------");
        } else {
            System.out.println("enter positive n value");
        }
    }
}


Output:(Click on image to enlarge):
Program-to-print-Fibonacci-numbers-output
Comment if you have any doubts.


06 December 2012

Brick Breaker java game source code


Brickbreaker-game


import java.awt.BorderLayout;
import java.awt.Color;
import java.awt.Dimension;
import java.awt.Font;
import java.awt.Graphics;
import java.awt.Rectangle;
import java.awt.event.ActionEvent;
import java.awt.event.ActionListener;
import java.awt.event.KeyEvent;
import java.awt.event.KeyListener;

import javax.swing.JButton;
import javax.swing.JFrame;
import javax.swing.JPanel;

public class BrickBreaker extends JPanel implements KeyListener, ActionListener, Runnable {
private static final long serialVersionUID = 1L;
// movement keys..
private static boolean right = false;
private static boolean left = false;

private static final int brickBreadth = 30;
private static final int brickHeight = 20;
// variables declaration for brick...............................
// ===============================================================
// declaring ball, paddle,bricks
private Rectangle Ball;//
private Rectangle Bat;//
private Rectangle[] Brick;
private Rectangle background = new Rectangle(0, 0, 350, 450);

//reverses......==>
private int movex = -1;
private int movey = -1;
private boolean ballFallDown = false;
private boolean bricksOver = false;
private int count = 0;
private String status;
private JButton button;

private static enum STATUS {
START, PAUSE, RESUME, STOP
}

private static boolean PAUSE = false;
private static boolean RUNNING = false;

BrickBreaker() {
initializeVariables();
JFrame frame = new JFrame();
button = new JButton(STATUS.START.name());
frame.setDefaultCloseOperation(JFrame.EXIT_ON_CLOSE);

// using this as parent layout exists (JFrame)
this.setPreferredSize(new Dimension(background.width, background.height));
frame.getContentPane().add(this);
frame.pack();

frame.add(button, BorderLayout.SOUTH);
// frame.setLocationRelativeTo(null);
// frame.setResizable(false);
frame.setVisible(true);

button.addActionListener(this);

this.addKeyListener(this);
this.setFocusable(true);
}

public static void main(String[] args) {
new BrickBreaker();

}

// declaring ball, paddle,bricks

public void paint(Graphics g) {
g.setColor(Color.LIGHT_GRAY);
g.fillRect(background.x, background.y, background.width, background.height);
g.setColor(Color.blue);
g.fillOval(Ball.x, Ball.y, Ball.width, Ball.height);
g.setColor(Color.green);
g.fill3DRect(Bat.x, Bat.y, Bat.width, Bat.height, true);

// this will paint below the peddle
g.setColor(Color.GRAY);
g.fillRect(0, 251, background.width, 200);

// this will draw border line
g.setColor(Color.RED);
g.drawRect(0, 0, background.width - 1, 250);
for (int i = 0; i < Brick.length; i++) {
if (Brick[i] != null) {
g.fill3DRect(Brick[i].x, Brick[i].y, Brick[i].width, Brick[i].height, true);
}
}

if (ballFallDown == true || bricksOver == true) {
Font f = new Font("Arial", Font.BOLD, 20);
g.setFont(f);
g.drawString(status, 70, 120);
ballFallDown = false;
bricksOver = false;
}

}

// /...Game Loop

public void run() {

// == ball reverses when touches the brick=======
//ballFallDown == false && bricksOver == false
while (RUNNING) {
if (PAUSE) {
sleep();
continue;
}

//   if(gameOver == true){return;}
for (int i = 0; i < Brick.length; i++) {
if (Brick[i] != null) {
if (Brick[i].intersects(Ball)) {
Brick[i] = null;
// movex = -movex;
movey = -movey;
count++;
} // end of 2nd if..
} // end of 1st if..
} // end of for loop..

// /////////// =================================

if (count == Brick.length) {// check if ball hits all bricks
bricksOver = true;
status = "YOU WON THE GAME";
repaint();
}
// /////////// =================================
repaint();
Ball.x += movex;
Ball.y += movey;

if (left == true) {

Bat.x -= 3;
right = false;
}
if (right == true) {
Bat.x += 3;
left = false;
}
if (Bat.x <= 4) {
Bat.x = 4;
} else if (Bat.x >= 298) {
Bat.x = 298;
}
// /===== Ball reverses when strikes the bat
if (Ball.intersects(Bat)) {
movey = -movey;
// if(Ball.y + Ball.width >=Bat.y)
}
// //=====================================
// ....ball reverses when touches left and right boundary
if (Ball.x <= 0 || background.width - Ball.width <= Ball.x) {
movex = -movex;
} // if ends here
if (Ball.y <= 0) {// ////////////////|| bally + Ball.height >= 250
movey = -movey;
} // if ends here.....
if (Ball.y >= 250) {// when ball falls below bat game is over...
ballFallDown = true;
status = "YOU LOST THE GAME";
repaint();
button.setText(STATUS.START.toString());
break;
}

sleep();
} // while loop ends here

}
private void sleep() {
try {
Thread.sleep(10);
} catch (Exception ex) {
} // try catch ends here
}

// loop ends here

// ///////..... HANDLING KEY EVENTS................//
@Override
public void keyPressed(KeyEvent e) {
int keyCode = e.getKeyCode();
if (keyCode == KeyEvent.VK_LEFT) {
left = true;
// System.out.print("left");
}

if (keyCode == KeyEvent.VK_RIGHT) {
right = true;
// System.out.print("right");
}
}

@Override
public void keyReleased(KeyEvent e) {
int keyCode = e.getKeyCode();
if (keyCode == KeyEvent.VK_LEFT) {
left = false;
}

if (keyCode == KeyEvent.VK_RIGHT) {
right = false;
}
}

@Override
public void keyTyped(KeyEvent arg0) {

}

@Override
public void actionPerformed(ActionEvent e) {
String str = e.getActionCommand();
if (str.equals(STATUS.START.toString())) {
button.setText(STATUS.PAUSE.toString());
this.startGame();
}
if (str.equals(STATUS.PAUSE.toString())) {
PAUSE = true;
button.setText(STATUS.RESUME.toString());
}
if (str.equals(STATUS.RESUME.toString())) {
PAUSE = false;
button.setText(STATUS.PAUSE.toString());
}

// if (str.equals(STATUS.STOP.toString())) {
// RUNNING = false;
// button.setText(STATUS.START.toString());
// }

}

public void startGame() {
requestFocus(true);
initializeVariables();
Thread t = new Thread(this);
t.start();
}

public void initializeVariables() {
// default size of a brick...............................
int brickx = 70;
int bricky = 50;
RUNNING = true;
// x = 160, y = 218, width = 5, height = 5
Ball = new Rectangle(160, 218, 5, 5);
// x = 160, y = 245, width = 40, height = 5

Bat = new Rectangle(160, 245, 40, 5);

Brick = new Rectangle[12];
// //////////// =====Creating bricks for the game===>.....
createBricks(brickx, bricky);
// ===========BRICKS created for the game new ready to use===
movex = -1;
movey = -1;
ballFallDown = false;
bricksOver = false;
count = 0;
status = null;

}

public void createBricks(int brickx, int bricky) {
// //////////// =====Creating bricks for the game===>.....
/*
* creating bricks again because this for loop is out of while loop in run
* method
*/
for (int i = 0; i < Brick.length; i++) {
Brick[i] = new Rectangle(brickx, bricky, brickBreadth, brickHeight);
if (i == 5) {
brickx = 70;
bricky = (bricky + brickHeight + 2);

}
if (i == 9) {
brickx = 100;
bricky = (bricky + brickHeight + 2);

}
brickx += (brickBreadth + 1);
}
}

}

Help improve my way to approach you by commenting. PLZ do comment.
Thank you.

 How To Arrainge Bricks In Game

GitHub Link

Contact Form

Name

Email *

Message *

Smooth Graphics Java

// Arrange Bricks in Game //java brick breaker game code without flickering // added game levels 1,2,3 in the game //java paddle ball ga...